Most people toss a $75 appliance into the trash without a second thought. That is a mistake. A toaster oven costs more than a basic pop-up unit, which means it deserves more effort to fix. The larger interior also gives you actual breathing room to work. You can see what you are doing. You can fit a screwdriver in there.
These machines range from simple horizontal slots to full miniature ovens. The difference comes down to wattage and controls. Broilers need more power. Baking modes need precise temps. But under the metal casing, the logic is mostly the same.
Why Your Toaster Oven Won’t Turn On
Before you grab your tools, understand the workflow. You set a control. The door closes. The thermostat kicks in. If you are toasting, a specific thermostat manages the upper and lower coils based on how dark you want the bread. If you are baking, a different thermostat handles the heat, sometimes paired with a timer.
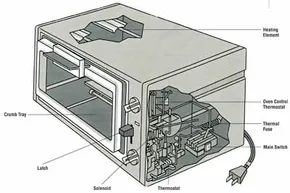
When it stops working, the issue is usually mechanical or electrical. The main switch, the thermal fuse, the heating elements, or the solenoid are the usual suspects. Start with the main switch. It gets used every single time you make breakfast. It wears out.
How to Service the Main Switch
The main switch is the heart of the operation. It takes a beating. Often, it just needs a good cleaning. Sometimes it needs to be swapped out entirely.
Step 1: Remove the side panel. You might need to disconnect the power cord first to get better access to the screws or clips holding the panel in place.
Step 2: Look at the contact points inside. Are they black? Pitted? Discolored? If they aren’t making a solid connection, the oven won’t get power. Take very fine sandpaper and gently rub the contacts. Clean the residue off with electrical contact cleaner or isopropyl alcohol on a cotton swab. Do not bend the contact leaves. If they are misaligned, the switch won’t engage properly.
Step 3: If the contacts are fused shut or the leaves are broken, you need a new switch. Main switches are usually attached to the chassis with clips, screws, or rivets. Remove the old one. Install the new one.
Check the Thermal Fuse and Cutout
If the main switch is fine but the oven still won’t start, check the thermal fuse. This safety part protects the switch from electrical overload. If the switch failed, the fuse likely blew too.
Use a continuity tester or a multitester to check for continuity. The fuse should complete the circuit. If it shows an open circuit, it is dead. Replace it with one that has the exact same rating. In many models, this means cutting the wires, removing the old fuse, and soldering or screwing in the new one. Some toaster ovens use a bimetallic thermostat or thermal cutout instead. Inspect this part for debris or distortion. Clean it with compressed air. If the contacts are dirty, use emery paper to clean them gently.
Testing and Replacing Heating Elements
The heating element is just a high-resistance wire. Electricity flows through it, it gets hot, it glows. It is simple. It is also easy to test.
Step 1: Touch the probes of your continuity tester or multitester to each end of the heating element. You are looking for a clear path for the electric current.
Step 2: If there is no continuity, the element is broken. You need to remove it. This varies by model. Sometimes it is just two screws and support brackets. Other times, you have to deal with rivets. Rivets are annoying. If you remove rivets, you will need to replace them with new ones or use screws if the frame allows.
Decide if the repair is worth it. If the oven is cheap and the element is hard to reach, you might just buy a new one. But if you have the tools and the time, replacing a heating element can extend the life of your kitchen appliance significantly. It is a simple fix for a complex problem.
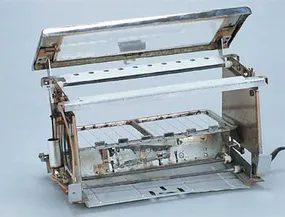
Swap the Heating Element with Precision
Once you’ve wrestled the old heating element out of the housing, the replacement process demands patience. You need a unit with the exact same wattage rating and physical structure. Do not force it. If you bend or distort the new element during installation, you risk cracking the ceramic insulators or breaking the delicate wire coils. These elements are fragile. Treat them like glass.
Higher-wattage elements use thicker wire, similar to what you see in a conventional wall oven. If the new part doesn’t fit the mounting points perfectly, stop. Do not twist the wires to make them reach. A poor connection leads to arcing, which creates a fire hazard far sooner than you’d expect.
Diagnosing a Faulty Solenoid
The solenoid is the unsung hero of the toaster oven, acting as an electromagnetic switch that cuts power to the heating elements. It should click on and off in rhythm with your timer. When it fails, things get messy.
If your food burns because the elements stay hot long after the cycle ends, or if the oven cuts power the moment you crack the door open, the solenoid is likely the culprit. Before you start unscrewing anything, look for signs of trouble.
- Visual Inspection: Check for melted plastic, scorched wiring, or discoloration around the solenoid housing.
- Smell Test: Burnt electronics have a distinct, acrid smell. If the area around the solenoid smells like ozone or burning rubber, there’s serious damage.
- Continuity Test: Use a multimeter set to the continuity setting. Touch the probes to the solenoid’s terminals. A good solenoid will beep; a dead one will show infinite resistance.
Replacement and Safety Warnings
If the test confirms failure, you must replace the unit. The difficulty depends entirely on how your toaster oven was engineered.
In some models, it’s straightforward. You simply unscrew the mounting brackets, disconnect the wire harness, and drop the new part in. But don’t assume yours is that simple.
Some manufacturers solder the solenoid directly into the circuit board. Cutting or desoldering these connections requires specialized tools and skill. If your repair involves soldering irons or cutting wires, stop. Take the unit to a professional appliance repair shop.
Attempting to DIY a soldered repair without proper equipment often results in ruined boards or electrical shorts. Is the time you save worth the risk of electrocution or setting your kitchen on fire? Probably not.
“If replacing the unit requires cutting or desoldering, take the unit to an appliance-repair shop for service.”
Beyond the Basics
Fixing the toaster oven is just one piece of the morning puzzle. What happens when your coffee maker decides to stop working right as the beans are grinding? That’s a different beast entirely. If you’re staring at a broken appliance and feeling stuck, there are troubleshooting charts available that can help you diagnose the issue before you buy a replacement.
The kitchen is full of small machines that control our daily rituals. When one fails, it disrupts more than just breakfast. It disrupts the flow of the day. Knowing which parts you can touch and which ones require a professional is the difference between a quick fix and a weekend spent in home improvement hell.