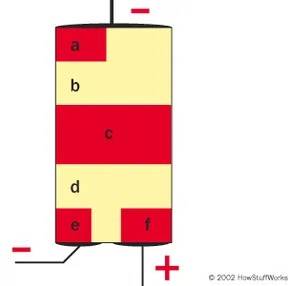
A triac is just a semiconductor switch. It controls electricity by opening or closing a circuit. The behavior depends on voltage at the terminals and the gate. Normal voltage sits across the main terminals. Low voltage at the gate keeps the triac open. It blocks current.
This happens because of something called depletion zones. Electrons from the N-type material fill holes along the border with P-type material. These zones are insulated. They have few free electrons or holes. Current cannot pass through them.
Apply strong voltage to the gate. The depletion zones break down. Electrons start moving. The triac conducts. The exact sequence depends on the AC cycle direction.
Let’s assume the top terminal is negative. The bottom is positive. The gate voltage matches the top terminal’s charge.
When the gate charges, the voltage difference between the gate and lower terminal drives electrons. Electrons leave N-type area e. This disrupts the depletion zone between areas e and d. Free electrons enter area d. This disrupts the depletion zone between d and c.
Electrons from area c move toward the bottom terminal. They jump from hole to hole in area d. This introduces more holes into area c. Electrons move out of the depletion zone between c and b.
The voltage is strong enough to drive electrons from area a into holes in area b. This disrupts the last depletion zone. With all zones dispersed, electrons move freely from top to bottom. The triac is now conductive. Some dimmers use a diac too. They work similarly.
For the triac to conduct, the gate needs a voltage boost. The required voltage level stays constant. You adjust how long it takes the gate to charge. A variable resistor and a firing capacitor handle this timing.
How the Variable Resistor Controls Brightness
The real magic happens at the variable resistor. Current flows through it to charge the firing capacitor. This component stores electrical energy on its plates. You can think of it like a bucket filling up with water. The triac waits at the bottom terminal. It stays dormant until the capacitor reaches a specific voltage threshold. Then it discharges. That sudden spike triggers the triac to conduct.
Turning the knob moves the contact arm inside the resistor. This action changes the total resistance in the circuit. It’s a simple mechanical switch that alters the flow.
Why Lower Brightness Means Higher Resistance
Set the knob to “dim,” and resistance spikes. The resistor essentially holds back the current. It slows the charge buildup on the capacitor. The voltage climbs slowly. By the time the capacitor is charged enough to fire the triac, the AC cycle is already deep into its wave. The triac turns on late. The lamp gets power for only a fraction of the cycle. That’s why it’s dim.
Turn the knob the other way. Resistance drops. The capacitor charges faster. It reaches the firing voltage earlier in the AC fluctuation. The triac conducts for a larger portion of the cycle. The bulb shines brighter.
The dimmer doesn’t reduce voltage; it chops the AC wave. Less wave means less power. More wave means full power.
This timing is key to understanding how these switches work. It’s not about limiting energy. It’s about when to release it. The capacitor’s charge time dictates the triac’s behavior. The knob controls that time.
You might wonder if this affects the bulb’s lifespan. It can. Frequent switching or cheap dimmers may cause flicker. That stress matters for older filaments. LEDs need compatible dimmers to avoid buzzing.
The mechanism is straightforward. Rotate. Change resistance. Alter timing. Control light. Simple physics. No mystery. Just electrons and timing.
Does your current dimmer feel smooth? Or does it stutter at low settings? That stutter often points to a mismatch in capacitance or a worn contact arm. Cleaning the internal contacts can restore smooth operation. A small brush and some contact cleaner work wonders.
Next time you twist a knob, remember the hidden capacitor. It’s counting seconds. Or milliseconds. The difference is brightness.
Why Your Dimmer Switch Buzzes
Here is the mechanical reality of what happens inside the dimmer. When the alternating current crosses back toward zero volts, the power driving the triac drops away. The electrons stop flowing. The semiconductor’s internal structure shifts, re-establishing depletion zones that cut off conductivity. The triac effectively goes dormant. It won’t turn back on until the gate voltage climbs high enough to trigger it again.
This cycle repeats hundreds of times a second. And it is loud.
You know the sound. That low, irritating hum or buzz emanating from the bulb or the dimmer switch itself. It isn’t a defect. It’s a byproduct of this rapid switching. The triac is chopping the sine wave, turning full power on and off in tiny fractions of a second to create the illusion of lower brightness.
The Source of the Noise
So why the buzz? It comes down to two main culprits.
First, the bulb itself. If you are using an incandescent or halogen bulb, the filament is physically vibrating. The rapid heating and cooling cycles cause the tungsten wire to expand and contract microscopically. This creates a mechanical resonance that you hear as a hum. Older bulbs or those that are nearing the end of their life often buzz louder because the filament is thinner and more fragile.
Second, the dimmer switch itself. Cheaper triac-based dimmers, especially those not designed for modern LED loads, can create electrical noise. The abrupt switching of current generates electromagnetic interference. This can cause the internal components of the dimmer to vibrate slightly, or it can induce a buzz in compatible bulbs that aren’t designed for phase-cut dimming.
How to Fix the Buzz
If your lighting setup is driving you crazy with noise, you have options. The solution depends on the type of bulb you are using.
1. Swap the Bulb
If you are using incandescent bulbs, try swapping to a high-quality LED bulb specifically labeled as dimmable. Not all LEDs are created equal. Cheap LEDs often lack the internal circuitry to handle the phase-cut dimming signal smoothly, resulting in buzzing and flickering. Look for brands that explicitly state compatibility with leading-edge or trailing-edge dimmers.
2. Check Compatibility
Modern LED dimmers often use trailing-edge technology, which is generally quieter and smoother than the older leading-edge (triac) dimmers. If your dimmer is old and your bulbs are new LEDs, you might need to upgrade the dimmer switch. A mismatch here is the most common source of buzzing.
3. Tighten the Connections
Loose wires inside the switch box can also cause buzzing. Turn off the power at the breaker. Remove the dimmer switch and check for any loose wire connections. Tighten them securely. A loose connection can arc slightly, creating both noise and a fire hazard.
4. Dimmer Load Limits
Every dimmer has a minimum and maximum load rating. If you have too few bulbs on the circuit, the dimmer may struggle to maintain a stable signal, causing buzz. Conversely, exceeding the maximum wattage can cause overheating and noise. Check the label on your dimmer. If you have only one LED bulb on a dimmer rated for a minimum of 100 watts, add a dummy