Most homes in colder regions still rely on oil-fired burners as their primary heat source. These systems, specifically pressure burners, spray atomized oil into a combustion chamber where a blower forces air and an electric spark ignites the mix. It is a high-pressure, continuous burn process. But an oil furnace is not a simple box. It is a complex assembly of mechanical and electrical parts.
Knowing the line between what you can fix and what requires a pro is the first step in keeping your home warm. You can handle routine maintenance yourself. You should not touch the internal combustion components.
Know Your Limits: What You Can Fix vs. What You Cannot
The maintenance tasks for an oil furnace are surprisingly limited. They focus on the peripheral parts that keep the system moving. You can replace filters. You can check motor belts. You can inspect switches and the thermostat. These are safe, simple tasks that prevent major headaches.
But the heart of the system is off-limits for DIYers. Electrodes, the oil nozzle, air tubes, the transformer, and the pump require specialized tools and testing equipment. These components demand professional service. Trying to adjust the burner mechanics yourself can lead to inefficient combustion or, worse, a safety hazard.
Accessing the Burner and Blower
To start, you need to see what you are working with. Remove the access panel covering the burner blower. Look for retaining screws around the rim of the housing. Unscrew them and set them aside safely.
On many models, you can also access the air blower and filter through a metal panel on the side. This panel is usually held by hooks or retaining bolts. If it is hooked, slip the panel up and off. If it is bolted, remove the bolts and lift it away.
Once the panel is off, look for the switches. They are typically located on the motor or in a switch box outside the housing. Look for labels like DISCONNECT SWITCH or RESET. These are your primary interfaces for power and safety overrides.
You will also see the stack control sensor. This is a critical safety device. It monitors burner operation from within the flue. It is held in place by a series of retaining bolts. Do not tamper with this unless you are a qualified technician. It is the last line of defense against dangerous exhaust buildup.
Essential Oil Furnace Maintenance Tips
You cannot fix a broken oil furnace with a wrench and a prayer. But you can forestall many problems with consistent upkeep. Follow these steps to keep your system running efficiently.
Black smoke from a chimney is a waste of fuel and a sign of incomplete combustion.
1. Check the Chimney Smoke
During the heating season, glance at your exhaust. If the smoke is black, the furnace is not burning the oil completely. You are wasting fuel. This is not a DIY fix. Call a professional service person immediately for adjustments. Proper combustion requires precise calibration of air and fuel ratios.
2. Clean the Blower Twice a Year
Dust and debris coat the blower blades, reducing airflow and straining the motor. Clean the blower at the beginning of the heating season. Then, do it again about midway through. A clean blower moves more air with less effort.
3. Clean the Stack Control Sensor
Soot builds up on the stack control sensor. This soot can insulate the sensor, causing it to misread temperatures or flame presence. Clean it about midway through the heating season. Use a soft brush or cloth. Do not bend the sensor tip.
4. Lubricate the Blower Motor
If your blower motor has grease fittings or oil ports, lubricate them midway through the season. Use cup grease or 10-weight nondetergent motor oil. Do not use all-purpose oil. It can gum up the works. You can find the correct lubricant at any hardware store.
5. Clean the Thermostat
Before each heating season, clean the thermostat. Dust and grime on the contacts can cause erratic behavior. Ensure it is actually the thermostat causing issues before blaming the furnace. A dirty thermostat can mimic a broken furnace.
The Bottom Line
There are not many quick fixes for an oil furnace. The complexity of the combustion chamber and fuel delivery system means that most repairs belong in the hands of a licensed professional. But routine maintenance is entirely within your control.
Check the smoke. Clean the blower. Lubricate the motor. Clean the sensor. These small actions prevent the majority of common failures. If the furnace still isn’t working after these steps, you likely have a deeper mechanical or electrical issue. That is where the professional comes in.
Keep the checklist handy. Start with the blower. End with the thermostat. And remember: black smoke means call a pro.
Why Your Oil Furnace Won’t Start
You’re cold. The house is quiet. But the oil furnace isn’t kicking on. Before you call a pro, check the basics. Often, the issue is simple. It’s not a complex mechanical failure. It’s something you can fix yourself.
Start with power. Is the breaker tripped? Check the main panel. Look for a separate switch near the furnace itself. Flip it. If the motor has overloaded, wait thirty minutes. Then press the reset button. Do not force it. Wait.
No fuel? Check the tank. If it’s empty, refill it. But if the tank has oil and the furnace still won’t run, the problem might be in the line. A blockage here stops everything. Clean the oil filter. Clean the oil pump strainer. If it still won’t fire, call a professional. Don’t guess with fuel lines.
How to Fix Low Heat Output
Your furnace is running. Air is blowing. But the house stays cold. Why?
First, check the thermostat. Raise it by five degrees. Just to test. If that doesn’t work, look at the air filter. A dirty filter chokes the system. Clean or replace it. Next, check the blower. Is it clogged with dust? Clean the assembly.
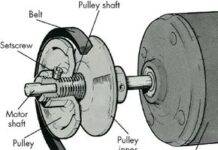
Are the registers blocked? Rugs. Drapes. Furniture. Move them. If the airflow is still weak, the system might be out of balance. You may need to adjust dampers. Or check the blower belt. Is it loose? Broken? Adjust it. Replace it if needed.
If the burner is dirty, stop. Call a pro. You don’t want to mess with the combustion chamber.
Solving Short-Cycling and Noise
Your furnace turns on. Turns off. Turns on again. Short-cycling. This wears out the system. It wastes fuel.
Check the air filter first. Dirty filters cause this. Check the oil filter too. If both are clean, look at the motor and blower. Do they have oil ports? Lubricate them. If the blower is clogged, clean it. If the stack control is faulty, call a professional. That’s a safety component.
Noise? Loose panels cause rattling. Tighten them. Squeaking belts? Spray them with fan belt dressing. If the belt is worn, replace it. Is the belt too tight or too loose? Adjust it. Again, if the burner is dirty, call a pro.
How to Clean and Replace Oil Furnace Filters
Filters are the heart of maintenance. Change them twice a year. Once at the start of heating season. Once midway through.
Here’s how to do it safely.
1. Shut off the fuel. Close the oil shutoff valve. This is between the tank and the filter. No fuel flow means no mess.
2. Remove the filter. Unscrew the bottom cup of the filter housing. Pull the filter out.
3. Swap it out. If it’s disposable, put in a new one. Same size. Same type. If it’s permanent, clean it per the manufacturer’s instructions.
4. Replace gaskets. Don’t reuse old gaskets. They leak. Use new ones.
5. Reassemble. Screw the housing back on. Open the shutoff valve.
Some furnaces have a pump strainer too. It’s on the pump, near the burner. Clean this when you clean the filter.
Tools needed:
– Wrench
– Kerosene
– Old, soft toothbrush
– Replacement pump strainer and gasket
Steps:
1. Unbolt the pump housing cover. Lift it off.
2. Remove the old gasket. Find the strainer. It’s a wire mesh screen.
3. Soak it in kerosene. Loosen the sludge. Scrub gently with the toothbrush.
4. Inspect it. Torn? Bent? Replace it.
5. Put it back. New gasket. Bolt the cover on.
The Stack Control
Sometimes, the filter is clean. The fuel is there. The furnace still won’t run. The problem might be the stack control. It’s a safety device. It shuts down the furnace if something goes wrong.
You can check it. Press the reset button on the stack control. If the furnace fires up, you’re good. If it doesn’t, clean the stack control. If that fails, call a professional. Do not bypass safety devices.
For more on keeping your home running, check our guides on furnace maintenance. Learn how to fix major appliances. Or tackle small appliances like toasters. And always check your thermostat. Calibration matters.
Cleaning the Oil Furnace Stack Control
The stack control is a critical safety component tucked inside the furnace stack. Its job is simple but vital: it monitors the burner. If ignition fails, the control cuts power to the motor to prevent dangerous gas buildup. But here’s the catch. Often, the furnace shuts down not because the burner is broken, but because the stack control itself has failed.
Before you panic, check your fuel tank. Refill it if it’s empty. If fuel isn’t the issue, press the reset button on the stack control. Does it fire up? If no, don’t press it again immediately. A second reset can be dangerous. Instead, you need to clean the control.
You’ll need a few basic items for this job. Grab a wrench, a stiff brush, soapy water, a soft cloth, some newspaper, and refractory cement.
Why the Stack Control Gets Dirty
During the heating season, soot builds up on the sensor. This accumulation can mimic a failure, tricking the system into thinking the burner won’t light. Monthly cleaning prevents this. If the control is caked in soot, clean it before attempting another reset.
Here is how to clean the oil furnace stack control properly.
Step 1: Remove the Control
Use your wrench to loosen and remove the bolts holding the control in place. Once the bolts are out, carefully pull the sensor and its housing out of the stack. Handle it gently. You’re dealing with fragile components.
Step 2: Clean the Sensor
Dip your brush in soapy water. Scrub away all soot from the control unit. Don’t use harsh chemicals; soapy water is enough. Wipe the sensor dry with a soft cloth. Any moisture left behind can cause issues when you power up the system.
Step 3: Clean the Stack Itself
Don’t just clean the sensor and ignore the rest. The stack itself holds debris. Spread newspaper on the floor to catch the mess. Disassemble the stack sections. Tap each section firmly against the newspaper-covered floor. This shakes loose the soot and debris trapped inside.
Step 4: Reassemble the Stack
Put the stack sections back together in reverse order. Ensure they are properly aligned. Connections must be firm. Gaps in the stack can lead to inefficient burning or safety hazards.
Step 5: Reseal and Reset
Reposition the clean stack control back into the stack. Use refractory cement to reseal the connection to the chimney. This ensures a tight seal. Once everything is back in place, you can try the reset button again.
If the burner still doesn’t operate after cleaning and resetting, call a professional service person. Do not keep trying.
Electric-Eye Safety Switches
Some oil furnaces use an electric-eye safety switch instead of a traditional stack control. It serves the same function. If your unit has this switch, locate the access cover over the photocell. It’s held by hooks or retaining screws. Remove the cover. Wipe it clean to remove accumulated soot. Reassemble the switch, replace the cover, and turn the power back on.
Does it work? If not, call a pro.
When to Call a Professional
If the control or the electric-eye switch is excessively dirty even after cleaning, your furnace might not be set to burn fuel completely. This is a combustion issue. Call a professional service person for adjustment.
Caution: Do not attempt to replace these controls yourself.
You can, however, set the switches. They must be in the ON position for the furnace to operate. Check their location in the next section.
For more on home repair, look into furnace maintenance to keep your system in prime condition. If other appliances are failing, check guides on major appliance repair. Small appliances like toasters are much easier to fix once you’ve tackled the furnace. And if you’re unsure the heating system is actually the problem, check the thermostat. Learn how to calibrate a thermostat to rule out simple errors.
Oil furnaces can be finicky. Before you assume the worst, check the basics. Some units have two master switches. One sits right next to the burner unit. The other is near the furnace housing or even further away. If either is off, nothing works. Flip them both to the ON position. Simple. Effective. Often overlooked.
Limit Switch Adjustments
The limit switch is a safety net. It lives on the furnace, just below the plenum. Its job is straightforward. If the plenum gets too hot, the limit switch cuts power to the burner. It also controls the blower. When the temperature drops after the burner shuts off, the limit switch kills the fan.
If your blower runs non-stop, something is wrong. Two possibilities here. Either the thermostat blower control is set to ON, or the limit switch needs adjustment.
Check the thermostat first. If the setting is ON, switch it to AUTO. If it is already on AUTO, the limit switch is the culprit.
How to adjust the limit switch:
- Remove the control’s cover.
- Locate the toothed dial underneath.
- Identify the sides. One side says LIMIT. Ignore it. Don’t touch it.
- The other side says FAN. This is where you work.
- There are two pointers on the fan side. The upper pointer sets the blower ON temperature. The lower one sets the OFF temperature.
The gap between them matters. Pointers should sit about 25 degrees apart. A good starting point? Set the upper pointer at 115 degrees Fahrenheit. Set the lower one at 90 degrees Fahrenheit. This prevents the blower from running endlessly while the unit cools down.
The Draft Regulator Role
Look for the draft regulator on the stack. It’s a small gatekeeper. When the burner is off, the regulator stays closed. When you turn the burner on, it opens automatically to let air into the chimney. This airflow is critical for combustion.
Signs it needs attention? Soot accumulation. Rattling noises. These indicate the draft regulator is out of whack.
Why does this matter? Too much air in the chimney wastes heat. It escapes up the flue before you can use it. Too little air wastes fuel. The oil doesn’t burn completely. Efficiency drops. Your wallet hurts.
To increase airflow, screw the counterweight inward. To decrease it, turn the counterweight outward.
Warning: Do not attempt this adjustment yourself unless you are confident. The draft regulator should be adjusted by a professional service person. Include it in your regular annual maintenance. A pro can spot subtle issues you might miss.
Burner Adjustment Limits
Can you adjust the burner yourself? No. Do not try. Call a professional service person for any burner adjustments.
Oil furnaces are complex machines. Messing with the burner without proper tools and training can lead to dangerous carbon monoxide leaks or inefficient combustion. It’s not worth the risk.
DIY Boundaries
You can’t fix every major problem with an oil furnace. Some issues require specialized knowledge and equipment. But with this information, you have the know-how to handle most common problems. You can troubleshoot switches. You can adjust limits. You can identify draft issues.
This knowledge saves time and money. It keeps your system running smoothly until professional help is needed.
For more on keeping your home comfortable:
- Furnace Maintenance: Learn the steps to keep your furnace in prime condition.
- Major Appliance Repair: Fix other machines if the furnace isn’t the only thing acting up.
- Small Appliance Repair: Once you’ve tackled the furnace, a toaster or blender seems easy.
- Thermostat Maintenance: Check the thermostat first. Calibrate it to ensure the heating system is actually the problem.