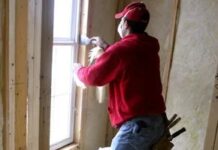
Before poured concrete became the standard, most homes didn’t have basements. They had cellars. These were usually dirt-floor, damp, and musty. But they worked. They kept apples, jellies, and pickled vegetables cool without electricity.
Today, basements are different. They are part of the living space. You might put a home theater, office, or gym down there. Or maybe just the furnace and laundry. Either way, they sit below ground. That means they are naturally cool and damp. Worse, porous foundations let cold air and water seep in. That leads to heat loss. And moisture.
Insulation fixes both problems. It keeps the warmth in. It blocks the damp. But you have to do it right.
Interior vs. Exterior Insulation Options
There are three ways to insulate a basement. You can do it from the outside. You can insulate the middle of the foundation. Or you can do it from the inside.
External insulation usually happens during construction. Sometimes it pairs with drainage projects to keep water away from the foundation. Middle insulation is also a construction-phase task.
For most homeowners, interior insulation is the only practical choice. It is also the most cost-effective method. There is a catch though. If you mess it up, you trap moisture. That creates mold. It ruins the walls. So pay attention to the details.
Check Your Local Building Codes First
Do not skip this step. Local jurisdictions have strict rules for insulating basement walls. Fire codes often require foam or batt insulation to be covered by drywall or another finished wall. You cannot just slap foam on concrete and call it a day.
Contact your local building department. Ask about the requirements. You need to pass inspection. Failing after months of work is a waste of time and money.
Determine the Right R-Value
Your insulation needs depend on where you live. The International Energy Conservation Code defines five zones in the United States. The farther north you are, the higher the R-value you need. R-value measures thermal resistance. Higher is better for cold climates.
Most of the country falls between R-5 and R-10. Check your zone. Buy the right rating. Buying less insulation to save money will cost you more in heating bills later.
Gather Your Tools
You might already have some of these items. If not, head to a hardware store. Here is what you need for a basic interior insulation project:
- Safety glasses
- Dust mask or respirator
- Protective clothing
- Stapler (electric, standard, or hammer type)
- Three-eighths or half-inch staples
- Work light
- Extension cord
- Tape measure
- Utility knife and blades
- Straightedge for cutting insulation
- Stepladder
Depending on the insulation type, you may also need:
- Expanding foam sealant
- Caulk and caulking gun
- Chalk line
- Gypsum drywall (half-inch)
- 2 x 2 lumber
- Tape (white vinyl or duct tape)
- Extruded polystyrene foam
- Power-activated gun with fasteners
- Construction adhesive
- Wire insulation hangers
- Ear protection
- Masonry screws, drill, and carbide drill bit
- Asphalt roofing cement
Decide: DIY or Hire a Pro
Most interior insulation jobs are straightforward. You do not need to be an expert. Some handyman skill is enough.
But some situations are trickier. If your basement has serious moisture issues, call a professional. You can find certified contractors through the Insulation Contractors Association of America. Or ask friends and neighbors. Who have they used? What did they think?
Once you know your R-value and have your tools, you are ready to pick your materials. The next step is choosing the right insulation type for your walls.
Choosing the Right Insulation for Basement Walls
You have options when it comes to insulating those cold basement walls from the inside. But don’t just grab the first box at the hardware store. The right material depends on where you live, how moisture behaves in your climate, and exactly how your basement is built.
Blanket Insulation
This is the standard. Fiberglass. It comes in batts, rolls, or blankets. Some have a face made of kraft paper, foil, or vinyl attached to them. They usually fit between standard wall studs. Batts are often 4 or 8 feet long. Rolls can be cut to fit. Blankets come in huge rolls, up to 64 feet. Standard fiberglass gives you an R-value of 2.9 to 3.8 per inch. It is cheaper than foam board, loose fill, or spray foam.
Rigid Foam Board
Made from polystyrene, polyiso, or polyurethane. Polystyrene boards offer an R-value of 3.8 to 5 per inch. Polyiso and polyurethane are better, hitting 5.6 to 8 per inch. The big win here? It keeps water vapor in its gaseous state. No condensation on the wall. But you must cover it with a fire barrier. Usually, a half-inch layer of gypsum wallboard does the trick.
Loose-Fill Insulation
Small particles of fiber or foam. They pour or blow into place. Cellulose, fiberglass, and mineral wool are common. R-values range from 2.2 to 3.8 per inch. Fiberglass is on the low end. Cellulose is the most efficient. The catch? You need to get the density right. Complete coverage is non-negotiable.
“Achieving proper density and complete coverage is the key to installing loose-fill insulation effectively.”
Liquid Foam Insulation
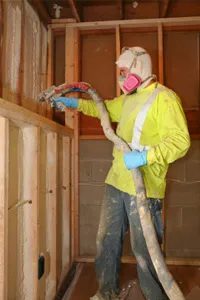
Spray, foam, inject, or pour. That is how liquid foam gets into place. Cementitious, phenolic, polyisocyanurate, and polyurethane are the usual suspects. These materials fill tiny cavities. Because of that, they have twice the R-value per inch compared to traditional blanket insulation.
Why Insulate Basement Walls?
The obvious reason? Save money on energy costs. But your actual savings depend on local climate. Your heating system matters. Fuel costs vary. The lifestyle of people using the basement plays a role too.
Thermal performance depends on proper installation. This is why hiring an experienced contractor is often worth it. For existing structures, the most cost-effective way to insulate while minimizing moisture problems is a combination of rigid foam insulation and an insulated frame wall assembly.
Airflow is everything. Experts talk about “inward drying.” This means the foundation should disperse moisture into the basement to let it dry. Restricting airflow traps that moisture. A true vapor barrier blocks moisture from entering. But it often traps moisture between the insulation and the wall. If you put insulation on a wood frame and encase it in polyethylene sheeting, the moisture stays inside. It damages the insulation. It damages the wood.
External vs. Middle Insulation Savings
Money saved depends on the method. Homes using 2 to 3 inches of exterior foam insulation at R-10 saved less than those using insulated concrete forms (middle insulation) at R-2.
Take a 1,500-square-foot home in the Midwest. Using exterior foam at R-10 saves about $400 a year in natural gas heating costs. That same home using insulated concrete forms at R-2 saves about $450 a year.
Sometimes the thicker insulation isn’t the smarter financial move. The physics of heat transfer and moisture management often favor the middle-ground approach for basements. You might find yourself looking at concrete forms instead of foam boards. Or perhaps you decide to stick with the cheaper fiberglass and accept the higher monthly bill. There is no single right answer. Just more variables to weigh.
The links on the next page might help you dig deeper. Or you might already have enough information to start cutting and fitting. The walls are waiting.
Finding the Right Basement Insulation Strategy
You have the materials. You have the plan. Now you need to decide which route fits your specific basement conditions without turning your home into a moisture trap. The choice isn’t just about R-values. It is about how your foundation breathes. Or rather, how it doesn’t.
Rigid foam board insulation is the go-to for many DIYers tackling basement insulation methods. It offers high R-value per inch and resists moisture. You cut it to fit between studs. You seal the gaps with spray foam. Simple. Effective. But it isn’t the only option.
Fiberglass batts are cheaper upfront. They are also more prone to trapping moisture if not installed correctly. If your basement has any history of dampness or water seepage, fiberglass might just hold that moisture against your concrete. That leads to mold. And mold is a problem you do not want to find behind your new drywall.
“The key is to manage the air and the water separately. Insulation handles the temperature. Air sealing handles the comfort.”
Preparing the Surface Before You Start
You cannot skip this step. No matter which material you choose, your walls need to be ready.
- Clean the concrete. Remove dust, loose debris, and any efflorescence (that white powdery residue). Use a wire brush. Vacuum thoroughly.
- Check for cracks. Seal any visible cracks with hydraulic cement. This prevents water intrusion from the outside in.
- Install a vapor barrier if needed. This depends on your climate zone and the type of insulation. In some cases, rigid foam acts as its own vapor retarder. In others, you need a separate polyethylene sheet. Check local building codes. They vary by region.
Installation Steps for Rigid Foam Boards
If you are going with foam boards, here is how you do it.
- Measure and cut. Use a utility knife. Score the foam. Snap it cleanly. Measure twice. Cut once. Wasted foam is wasted money.
- Fit the boards. Press them tightly between the studs. Do not leave gaps. Air leakage defeats the purpose of insulation.
- Seal all seams. Use expanding spray foam or foil tape. Seal around pipes, wires, and outlets. These are the weak points in your thermal envelope.
- Secure the boards. If you are not covering them immediately with drywall, use adhesive or mechanical fasteners to hold them in place. They can shift if left loose.
Why Air Sealing Matters More Than You Think
Insulation slows heat transfer. Air sealing stops drafts. You need both. A poorly sealed wall with high-R insulation will still feel cold. Cold drafts make a basement feel damp. They make it feel unfinished.
Use caulk around window frames. Use expanding foam around electrical boxes. Seal the top plate where the wall meets the ceiling joists. Every gap is a leak. Every leak is energy loss. And energy loss is money out of your pocket.
Safety Gear Is Not Optional
Fiberglass itches. Foam chemicals smell. Concrete dust irritates lungs. Wear the right gear.
- Respirator. N95 mask minimum. Better if you are cutting foam or dealing with old dust.